Antony Rappai

Tech Director & DPO in Education | EdTech Solutions Architect | AI/API & Low-Code Integrationist | Investing Enthusiast

Tag: Learn Coding

  • AWS Educate for the modern day Computer Science classroom

    AWS Educate for the modern day Computer Science classroom

    I always wondered how effectively we could utilize Cloud computing services like AWS, AZURE, and Google Cloud in an educational setting beside using it for offloading our IT Datacenter. Not long after that I was chatting with our IB Computer science teacher and learned of her challenges with implementing an Integrated Code Editor / IDE across a multi-platform environment consisting of Windows, Macs and iPads. It got me thinking and exploring in-depth into what AWS could offer, and that’s when I came across AWS Educate. However, before I dwell into AWS educate

    Firstly what is AWS?
    Amazon Web Services is the Internet and Cloud service wing of the mighty Amazon. Most basically it offers cloud computing/servers as a service or better know as Infrastructure as a service(IAAS). It also provides hundreds of other tools to develop, plan and host your scalable application ( be it a website, game, video hosting services like Netflix or anything else you can think off ), quite honestly it can be a bit overwhelming for the first-timers, but luckily for educational institutions there is a new offering from AWS called AWS educate.

    Screen Shot 2019-04-03 at 4.50.54 PM
    Four Pillars of AWS Educate

    Where Does AWS Educate fit into an educational institution?
    Once enrolled as a teacher in AWS Educate, they are granted a certain amount of free credits to deploy their virtual Lab and enroll students via an Email invite link. To make it more simple, AWS Educate comes with a prebuilt list of Six templates, each of them creating a virtual lab consisting of multiple AWS components depending on the computer science module you are teaching.

    One of the most common use cases for IB computer science would be using the Cloud 9 template, and building scalable websites. Each of these templates enables certain services on AWS that is just enough to start building your project, without having to worry too much about managing those individual components like compute (EC2), storage(S3) and Load Balancers.
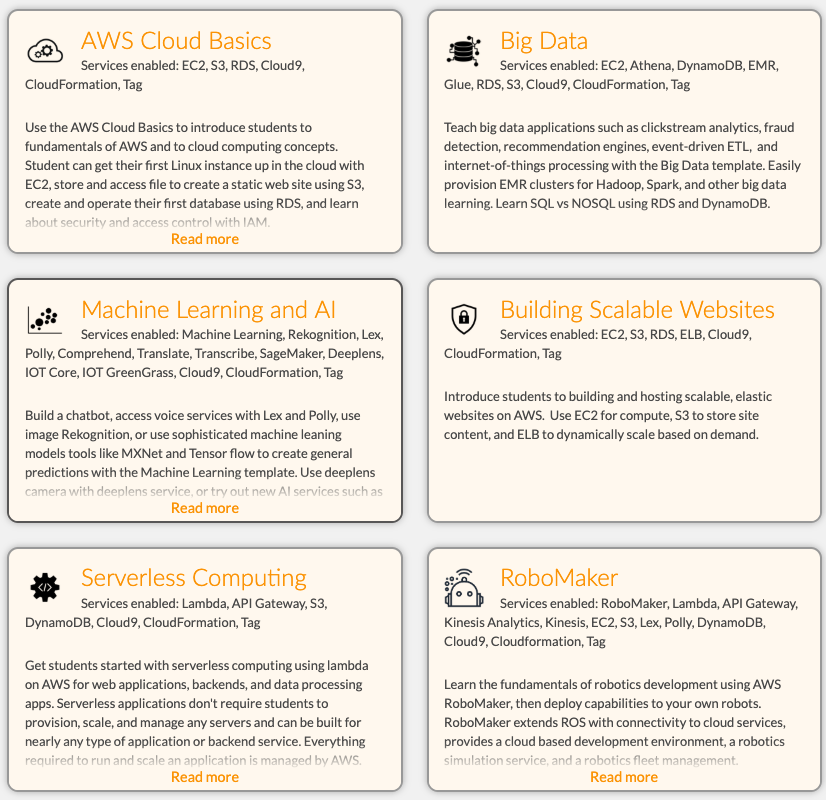
    Screen Shot 2019-04-03 at 4.43.50 PM
    Default AWS Educate Templates

    What is Cloud 9?
    Cloud 9 is a cloud-based code editor and an IDE that works with Python, Java, Ruby, HTML and much more. It is entirely cloud-based, which means no installing software on your computer or IPAD or Android, you can work with your projects anytime, anywhere and on any device.

    -It is a device agnostic ( OSX, IOS, Windows ) cloud-based IDE
    -It Works with different programming languages ( Python, C, Java, Ruby.)
    -Cloud9 allows for collaborating on coding projects between teachers and students like a   Google Doc

    Our move to a multi-platform environment for high school resulted in a device mix of OSX, Windows, and iOS, which made it hard for the teacher to ensure that the app dev environment was installed correctly on the computers let alone the iPads. AWS Cloud9 made it easy to get to the coding part straight away without the hassle of IDE installers, configurations and without worrying about backing up your work or working from another device. AWS Educate and Cloud 9 puts the ball in the teacher’s court by not having to rely on the Technology dept resources or lack thereof.

    Other Challenges that AWS Educate could address in an ever-changing world of technology especially cloud computing

    Most of the curriculum is not relevant when compared to today’s world of cloud computing, IAAS, SAAS, Virtualization. Although they do teach about the theory of computer architecture, networks, software development process/lifecycle, I feel it lacks the new age components of virtualization, containerization, network virtualization, Big data analytics, Artificial intelligence, and virtualization.

    AWS Educate gives the student a sneak peek of upcoming and future job trends. For Eg. What it means to be a full stack developer, DevOps engineer and how the job descriptions or job functions and roles have morphed from being a plain old computer programmer/engineer to a position where he/she needs to understand the complete app dev life cycle. Meaning he needs to have advanced knowledge in DataBases, Front end development, Back end development, UI.

    AWS Educate further enhances students knowledge in cloud-based networking, Web application firewall and the relevance of cloud computing in today’s world. They also gain a whole lot of exposure to Machine learning and Big Data Analytics – the role of AI in today’s computing world and how you can leverage the AWS platform with tools like Deep lens, Polly, EC2.

    Understanding cloud service offerings form AWS, Google cloud or Azure gives them a holistic view of web application development and transition of applications from the desktop to the internet/cloud.

    Another thing that could spark the interest of the young computer science enthusiasts across the globe is the AWS Educate Badges. Badges are a set of interactive courses build on Canvas LMS tailored for K-12, AWS Educate badges come in three flavors.

    • Cloud Explorer (all about cloud computing basics, data models, online privacy, algorithms)
    • Cloud Inventor  ( all about hardware & software, programming basics, data safety,   and redundancy)
    • Cloud Builder ( more about AWS core services related to  AWS Console, Cloud Storage, Cloud Compute, IOT Integration )

    AWS Educate also has something called Career pathways for the more career-oriented IT Professionals. AWS Educate’s Cloud Career Pathways helps you to start building the critical cloud skills you’ll need to be successful in leading technology careers. It lets you earn a completion credential for each pathway and share with prospective employers what you’ve learned.

    Screen Shot 2019-04-03 at 4.45.12 PM
    AWS Career Pathways

    The major cloud service providers like Microsoft Azure and Google Cloud platform has also come up with their own educational offerings; I anticipate more mid-level service providers like Digital Ocean and Heroku to come up with their own offerings. I would highly recommend piloting with AWS educate to expose today’s young computer science enthusiasts to tomorrow’s demand for new age technology jobs.

    Let me know your thoughts in the comments below or contact me if you would like to chat a bit more of my journey with AWS Educate.

    Sorry! This product is not available for purchase at this time.
  • Introducing Coding to Students & Teachers with Light Blue Bean

    Introducing Coding to Students & Teachers with Light Blue Bean

    What Is IOT (Internet of Things)?

    We’re getting really, really good at making small computers. While phones are an obvious example of this (your phone is much more powerful than a full sized computer from even twenty years ago), there are a lot of other places where we’ve started to stick small computers. All of these web-connected devices form something we call the IOT or “Internet of Things.”

    What Is Light Blue Bean?

    Light Blue Bean is a microcontroller that’s designed to be simple, cheap, and powerful. It’s a small processor that’s hooked up to a light, an accelerometer, a thermometer, and a few other bits of tech. Most importantly, however, it’s got built-in wireless. This enables you and your students to write custom code that can run on the Light Blue Bean. You can connect it to tablets, phones, and other devices in order to create connected systems. You can use it as a temperature sensor, have it control a lock, use the accelerometer as a game controller, or even program it to count the number of steps you take while you’re wearing it. The possibilities are endless.

    Do Other Devices Like This Exist?

    Light Blue Bean isn’t the only device of its kind. It’s an Arduino compatible device, which means it complies with certain standards when it comes to input, output, and programming. It competes with other Arduino compatible devices made by lots of other companies. Another popular mini-computer is the Raspberry Pi, which comes in a variety of configurations and price points. Like Light Blue Bean, these devices are popular among educators who teach students how to code.

    Why Teach Students To Code?

    One of the hottest terms among educators these days is “computational thinking.” It’s a concept that describes breaking down complex challenges into small tasks or pseudocode. Computational thinking is a valuable skill in any field, not just computer science. Being able to break down problems into more manageable chunks is absolutely vital to success in life. Since computational thinking provides a way for students to deconstruct problems in an organized and structured way, it’s often used to great effect for solving all sorts of challenges. Teaching students to code is an effective way of teaching them basic computational thinking techniques.

    How Can I Use Light Blue Bean In The Classroom?

    This step by step example illustrates how easy it is to make a basic program using the Light Blue Bean and the Tickle app. By changing just a few parameters, you and your students can make a wide variety of custom programs. For this example, we’ll make a controller for a boxing game.

    1. Open the Tickle App on the device you’re going to use for programming
    2. Make a new project using the Arduino Bean template
    3. There’s a bit of example code in the window when you start. In order to clear it, grab the blocks of code and drag them to the area on the left of your screen. They’ll disappear!
    4. In order to have a bit of fun, let’s add a character to our program! Go to the top right-hand corner to open the Devices & Characters dialogue. Let’s add a penguin for now. Penguins are very good boxers.
    5. A “When Starting To Play” block should have popped up on your screen. You can add code here that will execute when your program starts to run!
    6. Let’s add some control structures to our code. Add an “If / Then / Else” block from the code blocks on the left. It’ll be with the other orange control statements. Drag it under the “When Starting to Play” block in order to have this if statement executed when our program starts.
    7. In the green section on the left, you’ll find a bunch of operator expressions. Find one that compares numbers (less than or greater than) and drag it into the grayish box in your if statement. Now, your if statement will fire when the expression in the green box is true!
    8. You can type numbers into the boxes in your comparison operator in order to set the values. Let’s set the lower end (the number the pointy end of the < or > is pointing towards) to about 1.9. You can play with this value in order to change the way your game feels.
    9. Under the blue-green devices code blocks on the left, find the “Accelerometer” block and drag it into the other end of your comparison operator (the side the Pac-man wants to eat). Change the drop downs so it uses the x-axis of your Arduino Bean.
    10. Let’s make our if statement do some things! Under the first yellow block, drag in a pink sound and a purple “set looks” block. You can make these whatever you’d like. I’m going to set the look of my character to “shocked penguin.” These statements will be triggered when the if statement is called and the accelerometer is currently experiencing a high amount of acceleration, as set by the above green statement.
    11. Now let’s add some code to the “else” block of our if statement. Drag a purple “say” expression below the yellow block that says “else” and put in some text to let players of your game know that they need to punch harder. Try something encouraging like “keep trying” or “good work!”
    12. We’ve got the basic logic for our game all done! Add some control statements (like a loop) in order to call this code repeatedly. A few well-placed delays will keep your code from spamming your user. If you want to get really advanced, you might want to even use a variable to keep track of the highest acceleration the unit has experienced in the last second or so instead of checking the accelerometer in real time. Be sure to clear that variable after each success, however!

    Check Out My Video Presentation Below 

    https://www.youtube.com/watch?v=Fxu1HdqOAbg


    Check Out My Blue Bean Google Slide Presentation