Antony Rappai

Tech Director & DPO in Education | EdTech Solutions Architect | AI/API & Low-Code Integrationist | Investing Enthusiast

Author: arappai

  • Playposit Makes Teaching Language Easy

    Playposit Makes Teaching Language Easy

    Playposit is a hot new app that puts a tremendous amount of power in the hands of teachers. It’s a platform for creating and distributing interactive video content. At the most basic level, Playposit allows you to add text, questions, surveys, and other media events to videos. That’s not all, however. It’s got a whole host of powerful features, including the ability to synchronize content across multiple devices, easily view statistics and details about your student’s’ responses to questions, and even provide unique video lessons that adapt themselves to be perfect for each individual student. Best of all, it’s easy for people with very little tech experience to use.

    In order to understand the power of Playposit, consider the following example. You want to show students a video of a skit in a foreign language (let’s say it’s Spanish). Without Playposit, you’d probably show the skit and then have the students take a brief quiz.

    With Playposit, you have a lot more control over the order of operations. Because you’re able to insert events at any point in the video, you can pause the skit and ask questions whenever you like. This enables you to ask questions about events immediately after they occur.

    This is a pretty big deal on its own, but it’s a game changer in conjunction with another feature. Playpostit can jump around to different locations in a video based on the responses your students give to these questions. This allows you to provide remedial content or specific counterexamples in response to incorrect answers. It means that you can prevent students who don’t understand necessary prerequisite material from progressing too far into a lesson.These are just basic examples of things you can do. With a little bit of creativity, you’ll be able to achieve much more.

    Let’s go back to the skit example to see this in action. After a couple lines, you might pause the video and ask your students to transcribe a somewhat difficult line of Spanish. If your students give an exemplary response, you can skip right to the next video. They’ve proven that they’ve mastered the material you’re quizzing them on.

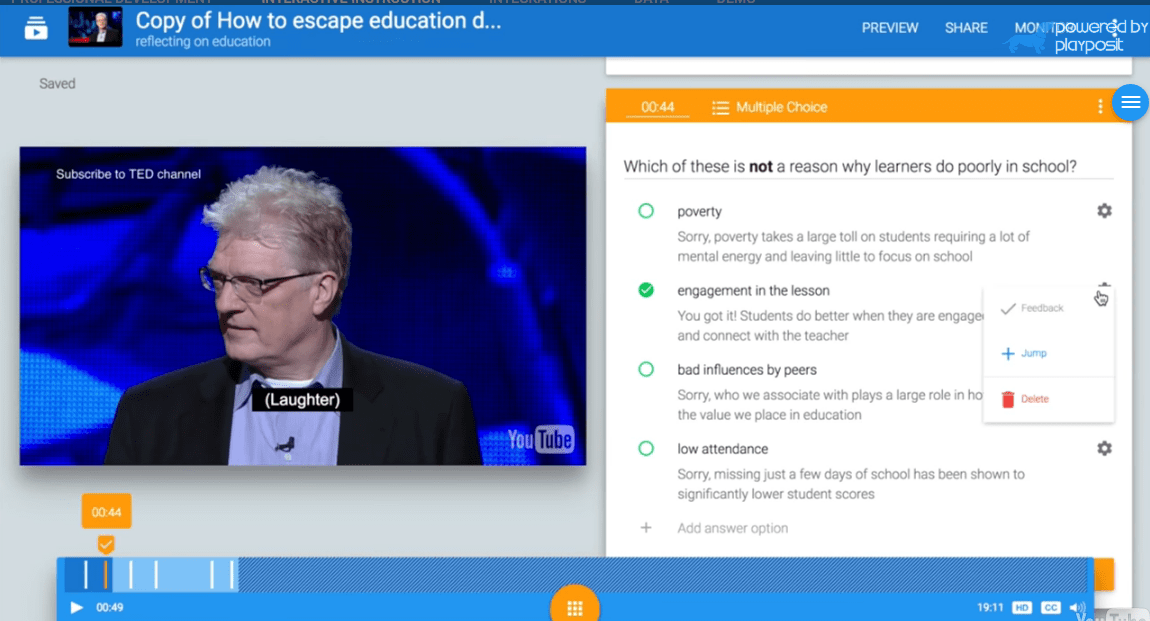
    If they don’t give the right answer, that’s fine. The skit might continue. After a few lines of dialogue, you can ask a multiple choice question. One possible response might simply back the video up so that the student can hear the line of dialogue again. Another (the right answer) might advance the video. Finally, two distractors (wrong answers) would jump to specific explanations of why each answer was wrong. After these explanations, students might be brought back to the original scene to try again.


    GETTING STARTED

    Playposit isn’t the only app to offer features in this vein. It is, however, one of the easiest to use. The interface is extremely simple and intuitive. If you’ve got any questions or you’re ready to try advanced stuff, however, Playposit offers free training sessions with live humans on their website. Here’s a basic guide to get you started with building your first interactive video lesson, or “bulb.”


    STEPS TO GET STARTED

    • You can import a video into Playposit directly from most internet sites, meaning you can effortlessly build a lesson around your favorite educational YouTube clip.

    Image0

    • Once it’s there, you can simply click on the timeline to add a question.


    image1.png

    • While adding time-jumps based on question responses sounds complex. Playposit makes it pretty easy. All you have to do is click the gear next to a question response and select “jump” from the drop-down.


    Image2.png

    • From there, all you have to do is use the timeline to select where in the video you’d like to jump to!

    Image3

    There are a lot more features that Playposit has to offer, but you can build some pretty powerful lessons with just videos, questions, and jumps. Try it out for yourself!


    INTERACTIONS WITH LMS

    Playposit realizes that it’s not the only tool you’re going to use. Because of this, it’s designed to integrate seamlessly with almost every LMS. This means you can assign videos with Google Classroom or PowerSchool, let your students watch them with Playposit, and then get question responses and grades sent back to Classroom or PowerSchool automatically. This will save you a ton of work!

    Playposit’s website has guides that can help you integrate it with your favorite LMS. Here’s the guide on integrating PlayPosit with Google Classroom: https://docs.google.com/document/d/1nPw92C7BEXkofz9-Knnu6nKhYH-ZnQUBaVOZkUEOmfc/edit


    A COOL TOOL FOR SCHOOL

    Playposit puts custom interactive videos within the reach of every educator. It’s simple, powerful, and incredibly easy to use. You can use Playpostit as part of a flipped classroom, as a way to supplement traditional lectures, or as a tool to host a synchronized playback of your video lessons. It’s not the most complex classroom app out there, but that’s one of its strengths. You don’t have to be a programmer to pick up Playpostit and make interactive “bulbs” for use in your classroom.While you do have to purchase it to unlock every feature, even the free basic version can be invaluable in creating custom video lessons. If you do choose to upgrade (or you can persuade your school to purchase an institutional package), Playpostit gives educators incredibly detailed statistics on how well their students are performing both individually and as a collective. If you think Playpostit might match your teaching style, it’s very much worth a try!

  • Our Recent Network Overhaul.

    Our Recent Network Overhaul.

    Last year I convinced the School to go for a complete network overhaul keeping the long-term technological requirements of our school in mind.

    What were the upgrade requirements?

    • Gigabit switches with ten-gigabit uplinks
    • Core Cisco(Cat 6500) network switches had to be upgraded with the newer Supervisory module that supported 10 G fiber modules.
    • Wireless access points with AC technology
    • A firewall that can support over 10000 concurrent connections, IPS, IDS, Malware Prevention & packet shaping.

    The reason: Our network infrastructure was aging, reached their end of life. With the existing 1g uplinks, we were facing bandwidth bottlenecks, loss of instructional time for the teachers and students due to wireless and network troubleshooting plus we were not equipped to upgrade our server infrastructure in the future to support 10g or 40g uplinks.

    What did we decide on ?: We did some extensive research on Cisco, HP, and Meraki and decided to go for cloud-based Meraki solution. The management of the access points and switches seemed simple and did not require a ton of technical knowledge as compared to the Cisco controller-based wireless and traditional command line based switches, the Meraki provided a simple, intuitive GUI to make magic happen, I was a bit skeptical  about requiring an internet connection for managing the bulk of our network. But we went ahead and decided to go for the Meraki MS350 for our switches, MR 42 for indoor access points, MR 72 for our outdoor access points. Meraki MX 600 for our firewall and upgraded our Cisco Core with Supervisory module VS-S2T-10G, which enabled us to go 10G and future proofed for 40G.This entire investment came to about 1 million $. I was going to miss the traditional command line utility for managing Cisco Network because I invested a lot of my time and energy in learning that plus it made me look too cool :)We went with a trusted partner who had tons of experience with providing network solutions.

    How did it all go? We took the summer break as the perfect opportunity to do all the installation, which went on for roughly a month. We had a few quirks with the technical setup and such, but the availability of support 24/7 via Chat and Phone with Meraki I was a huge benefit.

    Meraki WiFi Pros:

    • Manageability: A Beautiful dashboard with a consolidated view of the current clients, Access points status and switch status was a blessing in disguise, this helped us identify faults and be proactive.Easy to set up and configure the Access points, it was easy to create SSID’S, VLAN, change the radio settings &Channel width, monitor channel interference, monitor the clients on the AP, restart them etc.. One really cool feature was the ability to tag access points for, e.g., you could tag the access points on the 7thgrade with anything, and you could search for access points with a particular tag and monitor just them and make bulk changes.
    • Security: Meraki AP provides Layer 3 & 7 firewall on an SSID level, which enables us to block certain applications, ports, IPs and sites for the student SSID while keeping them open for the staff SSID, Air Marshal feature from Meraki can be set up in such a way that all rogue SSIDs connected to the School network is contained. 
    • Traffic Shaping: it is even possible to set traffic shaping rules on an SSID level for e.g. We can set up rules in such a way that a single client in a particular SSID cannot cross over 1 MB per second.
    • Access Control: You can setup SSID authentication via Radius server or login VIA splash page & LDAP, additional parameters include checking your computer for Antivirus before letting you use the network, etc. For using Radius server there is documentation on setting up a Windows server 2012 as a Radius server, I would recommend it and setting it up in such a way that only machines in a particular group in active directory can connect to the SSID – of course, you can’t use it on the mobile devices 
    • Additional features: There is a Packet capturing tool(you can capture the traffic to and from the client and AP) for some advanced troubleshooting.Cable testing from the AP to the switch port. Supports 80 MHz on the 5GHz band to take advantage of the Wireless AC to utilize bandwidth between the clients up to 700 Mb per second.

    Firewall pros:

    • Firewall settings: layer 3 & 7 firewall rules can be set up at the firewall level, adding them to the firewall and SSID is what I would recommend because we want to try and contain the threat at the first point of contact (which is the AP ), so the valuable processing power of the firewall can be utilized for IPS, IDS, and NAT, PAT, etc.
    • Security Center Dashboard: Perhaps one of the top features of the MX 600 is the security center ( comes at a price by buying the Firewall Enterprise Advanced license ), the Security dashboard gives you a nice view of the malware and IPS threats coming in from around the world plotted on a world map. It also tells you the clients on your network with possible malware infections and contains them ( this is cool ) until we had the Meraki we had no clue on how many hackers and bots were trying to infiltrate into the network.
    • Access Control: You can set up Internet access Policy via LDAP groups, for e.g. You can say only members of the staff group in the AD can access certain applications and websites.
    • Setting up NAT and PAT is a breeze 
    • Load balancing: Dual WAN ports, so it essentially becomes a load balancer, this was a huge plus because we have to pay a serious amount of cash for a 100 Mb IP VPN internet connection (we are paying about 15000$ per month 😦 – but with the MX 600 we had the dual wan ports so we could buy a cheaper 100 Mb business fiber and double our bandwidth using the second WAN. It even has a backup 4g dongle provision in case both the WANs fail.you can also set up flow preference to have certain traffic go through WAN 1 or 2 


    MS 350 Switches pros:

    • VLANS: Easy to setup VLANs and trunk ports on the GUI, assigning access VLAN ports and voice VLAN ports is a breeze. 
    • Routing: L3 routing ( only on the MS 350) is possible too for advanced network topology, we don’t have much use with because of the way our network is set up.
    • Stacking: The MS 350 is capable of physical and virtual stacking
    • Security: Mac filtering is easy, and LDAP authentication is a breeze on an individual port level.
    • Advanced troubleshooting: Cable testing to see if all the pairs are crimped correctly, Ability to see which client is connected to which port & a Packet capture utility to analyze traffic between a switch port and wired clients.


    Wireless Cons

    • There is not much really, one thing I wished it had was the ability to set up the packet shaping for an entire SSID rather than an individual client on a per-AP level, this might be a bit hard to explain, for, e.g., our wireless is comprised of different SSIDs and each SSID is tagged with a particular VLAN, so it would have been beneficial for us if we could set it up to assign a certain amount of bandwidth for the entire SSID, meaning we don’t want the whole student SSID to cross more than 30 Mb in total which is not possible, you would need something like a blue coat packet shaper to achieve this. 
    • Weird issues with AP’s not accepting clients 
    • Some settings take a few seconds maybe even like a minute to get pushed to the APs because they are cloud managed the settings take a while to travel all the way from the internet to our local AP, even things like restarting the AP’s take longer than expected in some cases.
    • Noticed Some channel interference with Apple TV and Mac clients 
    • Some of the clients show up with the wrong names – looks like the reporting is taking time to update on the dashboard ( again this is the disadvantage of moving to a complete cloud solution )
    • The AC & 5 GHz capable Clients always seem to connect to the 2.4 GHz in spite of having excellent 5GHz strength. BTW the signal interface is much less on the 5GHz band, which is why I want them to connect to them in the first place 
    • The band steering feature in the Wireless SSIDs to try and move the 5GHz clients to the 5GHz band does not work as well as accepted and is flaky  

    Switch cons:

    • The wired clients show up with the wrong MAC address, sometimes the port where the wired clients are connected shows up wrong too, noticed this is an issue mainly with Apple TVs and Mac wired clients 
    • There is not a way to bulk restart all the switches at once; this would have been a good way to restart all the AP’s at once too.


    Firewall Cons:

    • Again the inability to set up the packet shaping for an entire VLAN rather than an individual client on a per-VLAN level is a major drawback.
    • Pricing on the advanced license is very steep.

    Other pros:

    • Easy to manage dashboard, accessible from anywhere 
    • Good for a school environment, because it is easy to maintain and you can free up some of your time to involve yourself in other cool projects.

    Other cons: 

    • Your entire network seizes to function if your support license has expired ( sounds pretty scary – don’t worry when they are close to expiry they do a good job of reminding you, you just need to find the $$) 
    • You need to factor in the price of the licensing over a long-term meaning ing you need to work out a Network keep alive cost projection for the lifetime of the equipment and that could be expensive for smaller organizations.

    I am sure I missed out a lot of points, but I will keep updating this post on a regular basis, so check back or contact me to know more if you plan on investing in Meraki, I can show you how we have it all set up.

  • Apple TV and Meraki headaches

    Apple TV and Meraki headaches

    Just when we thought our brand spanking new Meraki is working like a charm, we started getting calls from teachers saying that the Apple TV’s kept on disconnecting every few minutes and in some cases it would disconnect every few seconds, this got really frustrating – as we did not face many issues with our previous Cisco Wireless Setup.

    Its been over one month and we still haven’t figured out what is going on, we searched the internet to find help and tried them all, still no luck. If any of you are out there with a similar network setup, please read along to see how you could troubleshoot Apple TV issues

    Our Network Infra consist of 2 Cisco cores in VSS mode with multiple VLAN, all Apple TV’s are on a particular VLAN and wired

    All our Access points are MR42 & Switches be MS350 (no L3 routing enabled)

    Teachers are connected to a Staff SSID (configured in Bridge mode and WPA2)

    How did it all unfold?

    Initially, when our teachers started complaining, we would restart the AP and ask them to restart their computer, but then this became school-wide and spread like a virus – it kind of made the IT look bad because we just shelled out 1 million for this new Network Infra. I went into the classrooms multiple times to figure out what was going on and started doing a bunch of changes to the network – to the point where I even lost track of what all I did.

    What did I do?

    Minimum Bitrate: I changed this setting on the Meraki SSID to 36 Mbps – that means no more 802.11b devices, well tough crap for anyone who still has them. This means no more of those old devices would fight for valuable airtime leaving more bandwidth for the rest of the school owned devices; the roaming seemed better too after I changed this setting

    Dual-band operation with band steering: this was recommended by some experts in order to increase the utilization of the 5GHZ Band which has much less interference, I thought this would do the trick, my gut was telling me that getting the Apple Macs to use the 5GHZ would be the answer, the 2.4ghz is used largely and has better range, but it also comes with ton of interference from microwaves, neighboring SSID’s, hotspots, etc . but this setting seemed to have caused more harm than good, because now I started noticing that the Mac clients were constantly hopping between the 2.4 and the 5Ghz band where I noticed a pattern where the Mac would get disconnect from the ATV when the client kept switching radios ( not AP’s or SSID )

    Manual 5Ghz Band Assignment: Since I couldn’t turn off the 2.4Ghz radio on the SSID because I still had a ton of devices that needed them, I decided to start manually turning off the 2.4Ghz on individual AP’s to try and force the clients to use.                                      Did I have any luck ? not really, the disconnections were still intermittent, some teachers started saying it was better and some started saying it was worse. Felt I was getting back to square one every time.

    Now this became a dangerous obsession, and I created a Meraki Support ticket, and they asked me to capture the packets using their packet capture utility, while that feature was not working just when I needed it the most, I decided to sit in the classrooms and started monitoring the behavior of the clients with regards to the WiFi connectivity.I also read some articles on how the Mac and Apple TV connect via Bonjour and that the apple tv used channel no: 6 on the 2.4Ghz and 149 & 153 on the 5Ghz for their peer to peer communication.

    Read this http://community.arubanetworks.com/t5/Technology-Blog/Apple-TV-Peer-to-Peer-using-WiFi-channels-6-and-149/ba-p/223027

    & this http://help.apple.com/deployment/ios/#/apd8fc751f59

    Now I started to find patterns on client’s that were connected to the SSID on channel 6,149 & 153 were dropping their ATV connections more frequently.

    Manual Channel assignment: After I had read the above two articles, I started manually changing the channel to anything other than 14

    Channel width: The channel width on the 5GHz band was set to 40MHz, upon Meraki support engineers recommendations I set it to 20 MHz which means the wireless AC clients could not utilize the full glory of the AC network, but at this point we needed stability, plus in dense AP environment it is highly recommended to reduce the Channel width, the channel width could be set to 40 or 80 MHz in an auditorium or outdoor AP when the Access Point density is less.

    Did this all work out in the end? 

    A combination of the tinkering with the channel width, manually disabling the 2.4 GHz band and manual assignment of channels on the 5 GHz to anything other than channel 149 seems to have alleviated most of the problems, but every now and then there are the intermittent disconnections between the Apple TVs and the clients. I will be updating this post once I have it all completely sorted out.

    An update: As of September 2017, I must say things are looking a lot better, an upgrade of the Meraki Switch and Wireless firmware and OSX upgrade to Sierra, the Apple TV connections feels a lot more stable. The Meraki firmware supports Apple 802.1r and Fast Roaming, which could help alleviate some of the roaming issues. I am still yet to try these out BTW.

    However, I still have concerns about the Meraki switches and the Cisco Core Switch Network not playing nicely with the Virtual Switching System ( VSS ). I am still doing some research to get to the bottom of this. I will update this blog post as soon I find some more

    An Update: As of October 2018, I am seeing much more improvement and stability with the Meraki – Mac – Apple TV. Changes include OSX High Sierra. One thing that really stood out after the Osx upgrade is the Clients don’t keep hopping as much, instead for the most part they were associated with the closest access point and the biggest difference of them was that I noticed most of the clients were also associated with the 5Ghz network instead of the 2.4 Ghz network which cuts the interference by half.

    We also reduced the number of SSID’S per AP from 6 to 4, which may also have helped with the cause – because that is one of the first things that Meraki support asks us to do

    If you are still having problems I would highly suggest trying to look into RF profiling

    https://documentation.meraki.com/MR/Radio_Settings/RF_Profiles